Thursday, April 14, 2011

Button, button, who's got the button!?

Do you know how easy it is to put buttons onto your favorite project? Honestly it is so easy to do buttons that after you figure it out you will be putting buttons on everything... even things that don't need a button! Sewing the actual button is very simple to do by hand (my husband's uniform pops a button nearly every week so I sew a lot of buttons) but the button hole, now that's a different story! Many machines have built in button hole stitches. If you aren't sure if yours does then take a peak at your stitches. Do you see a little rectangle shaped stitch like these?


Yes? OK great! If your machine has these stitch options then you can make a super easy button hole! If your machine has these stitches built into it then it probably came with a button hole foot. Which looks like this!


Put your button hole presser foot on your machine. Now you will have to pull down the button hole size indicator (I don't really know what its called... its been ages since I have looked at my manual but that's just what I call this part since that's the job it does!) It is on the side of the presser foot shaft and it will be in between the 2 plastic parts on the side of the button hole presser foot.


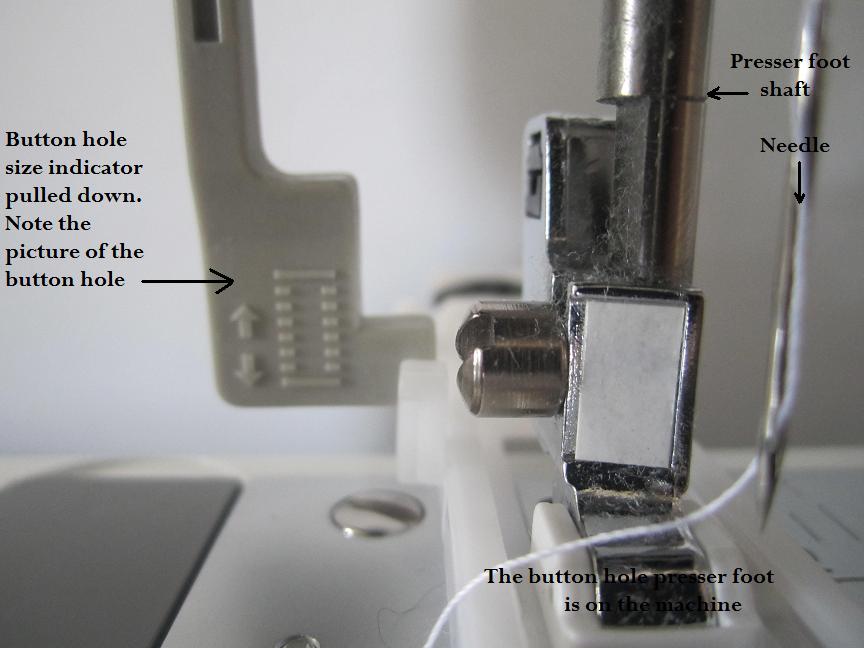
Here is a side view so you can see how the button hole size indicator (the part on your machine that you pull down) determines how large to make the button hole. When you are sewing a button hole the stitching starts out in front (closest to you) and works its way to the back of the button hole.


This is where you will start out. See how the button hole size indicator is closest to the front of the machine between the two plastic parts?


This is the end of the button hole. See how the button hole indicator is at the back, furthest away from you?

Its very simple.
  1. take off the regular presser foot and put on the button hole presser foot
  2. pull down the button hole size indicator
  3. put the button you are working with on the back of the presser foot and press the plastic part to hold it in place
  4. set your machine to the stitch you like.
  5. place your fabric under the presser foot. You want to place the fabric so that the bottom of the button hole will be closest to you. The machine will start there and work its way backwards.
  6. sew the button hole! Just put the presser foot down and hit the gas. You don't have to feed the fabric through or move it around, the machine does it for you.
  7. after the button hole is done take your seam ripper and carefully cut the fabric between the stitches.

See how easy that was? Just in case my written instructions are confusing here is a video!


Now do you see how easy that was?! So how many button holes have you made now? After I learned how to do this I literally made 13 button holes in a day on things that seriously had no need for buttons! It's just too easy!

Tuesday, April 12, 2011

Toss Pillows

A friend of mine had me turn some shower curtains into regular curtains and with the remnants I made some toss pillows. Making regular curtains from shower curtains is just so easy that I don't need a whole blog on them... all you do is fold over and sew the part where the eyelets are... tada! you now have a curtain! But pillows... now those can be a little more complicated.

I made several kinds of pillows with the remnants I had so I will start with the easiest. Just a plain old square pillow. You can honestly make any shape of pillow using this method though. You will want to start with 2 pieces of fabric which are the same size and shape. With the "right" sides (the pretty sides) facing eachother pin the pieces together or just sew without the pins. On something this simple I usually don't pin... because I am lazy!

These two pieces of fabric don't have to be perfect because you are going to turn it right-side out and the uneven parts will be on the inside. Pin this if you want or don't, it doesn't matter! Sew each side leaving about 1/4-1/2 inch seam allowance. Leave a small opening just large enough for your hand to fit inside so that you can turn it right-side out and stuff it.
You can see in the upper right hand corner where the pillow is not sewn all the way. Now you are going to stuff the pillow working from the farthest corner towards your open corner.  When the pillow is all stuffed you are going to push all the stuffing away from that opening and fold in the unfinished edge and pin the pillow closed (or just hold it closed like I do!) and then sew about 1/8 of an inch from the edge to seal the pillow. You can sew this with your machine (like I do DON'T FORGETH YOUR BACK STICH) or you can do it by hand.


Now how about a ruffled pillow?! There are lots of ways to do this but here's how I like to do it!

First I work with the ruffled edge. I measured out 4 strips of about 4 inches wide and about 17 inches long. But obviously whatever size pillow you are planning on making you will be measuring a little differently. Don't cut the main part of the pillow yet though because you can't be sure how big or small you will need until you do the gathers and measure the inside of the "frame".

I folded each of these strips in half length wise and ironed them. Then I took 2 of these strips and folded both ends in to make a point.
Fold the ends of 2 into points and iron these (be sure to set your iron to an appropriate temperature for your material)

Now you are going to make a square... it will kind of be like a picture frame.


Sew each corner together like this. Nothing fancy, just a line from the tip of the point to the middle. DON'T FORGET YOUR BACK STICH!
Now you have this picture frame like square (or whatever shape) of fabric. Now for the gathering to make it ruffled! Please see video on how to ruffle!
After you have gathered your frame you can now measure the size of the inner square. For me with this pillow it was 12 inches. So I cut out two 12 inch squares of fabric. (sorry I didn't take pictures of these but I assume you know what a square looks like) I ironed the edges of these squares under about 1/4 inch (that will be your hem) to give it a finished edge. After your main pillow parts are ironed you can sew them to the ruffle. You can pin if you want or you can just hold them together and sew. Work with one side at a time.
Here you can see that I have one side sewn to the ruffle. Now I will flip this over and sew the other square on. I will sew each side except one and then I will stuff the pillow.

OPTION 2: You can make a pillow sham instead at this point (if you have measured and cut and sewn everything the size of your actual pillow (standard or king size) Just take 2 pieces of fabric that can overlap to cover the back of the pillow. Start by sewing the two ends and then overlap them and sew the sides. Now you have an overlaping pocket opening that you can put a pillow into. OR you could just sew a pillowcase to the back!

I like to leave the pillow still on the machine with the needle down but walking foot up... you can take it off your machine if you want to when you stuff it but I leave it on because that's just one less step for me! After the pillow is stuffed you can finish up that edge.

And tada! You are done. What do you think? Did you make some pillows? I would love to know how they turned out!

Tuesday, April 5, 2011

30 second zero dollar NO SEW nursing tank top

Ok, so you don't have time to sew a new shirt? That doesn't mean you can't make one! "But, Nichole, my sewing machine is in storage!" Well you can still make this!

Start with 2 tank tops (or even 2 shirts if you want) that are made of a no fray jersey or knit material ( so that you wont have to hem anything). I am using these two old A shirts that my husband doesn't wear anymore.
Now I am going to cut holes for nipples in one shirt and cut the bottom of the other shirt off. I am using the darker fabric shirt to layer on top of the lighter fabric because if I was using the lighter color over the darker it would show through.
I cut the holes for the nipple openings small enough so that just the nipple shows but large enough so that I can reach through the hole to unsnap the bra.

And that's it! Walk out the door and move on! You have a new shirt! Put on the shirt with the holes and then put the cumberbun part over those holes! You get extra bonus points if you have a belly band from your pregnancy and don't have to cut up a second shirt! How cool is that! You can also use the same cumberbum you just cut out on other shirts!


Homemade Prefolds!

So I posted this on my old blog but I am reposting (and adding a few things) on here so that all my craft projects are on here. Making prefolds is just too easy!

So first you will want to decide a few things. What material are you using? You can honestly use anything but I like using hemp because it is the most absorbent without needing so many layers! And now you want to decide, How many layers thick do I want my prefold? After you know that you will have to do some math. Who ever said you wouldn't use the math from back in Elementary school was lying! I like my prefolds to be about 12-15 inches wide - so I will have three 4-5inch panels... does that make sense? So you take the amount of layers you want times the number of inches each panel will be (for example If I want a 2-3-2 prefold meaning the two outer panels are 2 layers and the inner one is 3 layers then I will add 2+3+2=7(layers) x 4 (inches per panel) = 28inches needed.) OK, did you figure out the math yet? After you have worked that out you will need to decide how long you want your prefolds to be. I like mine to fit in a cover without needing to fold them down at all so I like about 15in or so. Recently I bought 5 yards of hemp french terry and using the math I just explained I worked out this plan for cutting to maximize the usage of my fabric!
The fabric I have is 60in by 5 yards, I am able to cut this in half so that I have two 30in by 5 yard pieces. 1 yard is 36in 5 yards is 180in/ 15 in (thats how long I want my prefolds to be) = 12 I can make 24 prefolds with this fabric. 
Obviously if you want your prefolds thicker your work up may be different from mine... this is just how I like mine. As a trick though if you still want to use this work up you can still cut like this and then make it a 3-4-3 by adding a 12-15in piece of fabric in after everything is all ironed. Or you could just add a couple 4-5in pieces to the middle panel if you wanted a 2-4-2. You can really customize it however you like.

So to fold a prefold you start by folding about 8-10 inches (depending on how wide you are making each panel) over. If you want that center panel thicker and you have allowed for that in your math earlier (meaning you have 35in wide pieces and not 30in wide pieces like me) you can fold over 4-5 inches first and then fold over the 8-10 inches. After each fold you want to iron a nice hard crease.
Now you are going to fold the other side over 8-10 inches. You will be overlapping the middle part by 4-5inches. Iron all your folds. You will now have a rectangle or square that has 3 panels. Two that are 2 layers thick and one (in the middle) that is 3 layers thick.
One side will be flat and look like all one piece. The other side will have a middle that has been folded over and will look like 2 pieces. Do you want your prefold a little thicker? Then add a square or rectangle that is the same size as the prefold when it is all folded up into the middle of the folded up prefold. No one will know that you didn't do all that extra folding! Now you are going to sew the middle panel in place. Very simple just a a straight line on both sides of the middle panel. You can tuck under that one unfinished edge of the middle panel so it looks nice but if you are using a knit material this is not necessary.


To finish up the edges of your prefold you are going to do a zig-zag stitch just like you did with the bra pads. Set the machine to its waviest setting and when you sew the needle will hit the fabric on one side and no fabric on the other side. This will close up that seam nice and tight.

If you want a layer of "stay dry" feeling for your baby (if you are using these trifolded like I do) then you can simply sew a piece of fleece the same size as the middle panel onto the middle panel.
And here is the finished product. My edges are a little wavy because this material I am working with is SO stretchy and I just cant get the tension perfect. So again, if you want to - for a stay dry feeling or a nice cute look you can add some fleece to the middle. You can even leave the ends open so that you can stuff doublers in there like a pocket prefold!

So what do you think? Still think cloth diapering is too expensive of an investment? It cost me $40 for these 5 yards of fabric and I made 24 diapers... Thats less that $2 per diaper! I would love to see what you did! Did you add the fleece? Or maybe some decorative ribbon? Prefolds are so versatile! You can use them as diapers or you can use them as burp cloths or dusting towels... What else have you used a prefold for?

Cloth Bra Pads!

Today we are making cloth bra pads! These are great for yourself or for your mommy-to-be friends. For most of my Mommy-to-be friends I made a little "Mommy Essentials Kit" with a pair or two of bra pads, a nursing cover, a changing table cover, and a few matching burp cloths. I will show you how I make all those things but today we will just work on the bra pads!

They are so very simple yet so useful. Before I made these I was going through 2-4 pairs of disposable bra pads everyday! Now I can get through a day with just one pair of cloth pads and we eliminate the waste of a disposable pad! You can use any material you want (when I am doing a new mommy kit I like to use all matching finished material) but I really prefer using hemp for my bra pads. What ever fabric you are using you may want to wash it to preshrink it or not... I don't typically prewash/preshrink anything and instead I just cut things a little bit bigger to allow for shrinking.

Hemp is antimicrobial and it will really cut down on the sour milk smell that your disposable or other cloth bra pads tend to hold. Now if you do use hemp (or any other natural fiber material) be sure that you prep your bra pads (just like a natural fiber cloth diaper) before you use them. Because hemp is a natural fiber it contains natural oils which inhibit its absorbency so you will want to wash that oil out really well to ensure proper absorbency. Once hemp is prepped it is VERY absorbent! Just messing around I found that the hemp pads I make tend to hold about 2oz without leaking. Another benefit to cloth pads is that they dry as the day goes on and will be able to absorb more later. A disposable pad will not dry and absorb more later, you will just have to throw it away after it is full. But also like cloth diapers your cloth bra pads can become non absorbent if the fibers get stuffed up with detergent and soap build up. You can combat this by boiling your bra pads for a few minutes then dumping the water and repeating a few times. You know your material is prepped when your put a few drops of liquid on it and the liquid is absorbed right away!

The bra pads I make do not use PUL or TPU which is a waterproof polyester with polyurethane backing. Instead I like to use fleece because it is water resistant but still breathable. I have never had a bra pad with fleece backing soak and show through my shirt or bra... I have however not prepped a pad before and had the milk just trickle down right under the pad!

I also do not have a fancy serger (Santa, if you are reading, I want one for Christmas this year and I have been such a good girl so I really deserve one!) so instead I use a zig-zag stitch all around the edge of my bra pads to give them that serged look without having any fraying. To make my bra pads lay as flat against me as possible but still have many absorbent layers I use 4 different sizes all sewn together. The middle (closest to my nipple) is the thickest. I sew the three most inner layers together and then sew them to the outer layer before sewing the whole thing to the fleece layer. I sew each layer because if I don't when I wash them I will have a bunch of balled up pieces of hemp inside a little hemp fleece pocket and that just wont do!

Here are my 4 different sizes, I just used these little bowls as a guide the largest is about 5in round and the smallest about 2in round. I also cut my fleece layer with the same largest (5in) bowl.

Here you can see me sewing the 3 inner layers together


and here we add the fleece layer using a zig-zag stitch all around the edge.
 When sewing in the round you want to take your time at first. Until you become more comfortable and know your machine well. If you go too fast your lines will be really sloppy or straight for that matter and that's not what you want. It wont affect the functionality (unless you really get sloppy) but it wont look so pretty!

I did make a few that were coned a little and more conformed to fit your breast but in all honesty they really didn't make the pads any less noticeable and was just another step that wasn't worth it for me. If you want to give that a try anyway then I would sew the whole thing like you normally would and then cut from one end to the middle then overlap the part you just cut to form a cone shape and sew that cut part.

If the pictures didn't help you here is a video. Sorry it is long because I show you how to do it basically from start to finish!
To give a more finished look or to have it match all the other stuff you are giving your new mommy friend you can add another layer (of whatever material) on the outside of the fleece if the fleece doesn't match the other fabric you are working with. When gifting these I like to put a pair or two together and then tie them together with some ribbon to make it look nice. I hope you enjoyed making these for yourself or your friend! These see so much use at my house! I like to have about 4 pairs on hand because then I only have to wash every other day or so. If you made these let me know how they turned out for you! Do you have any suggestions or other tips that I didnt mention?

Happy crafting everyone!

Monday, April 4, 2011

Choosing a Machine

Someone just asked me "what is the best machine for a beginner"? Well I don't have a very simple answer for that but I can help you decide what you think will be the best for your needs. Ask yourself:

How much am I willing to (or able to) invest in a machine?
  • You don't need to spend a ton of money on a machine. If you buy new, a simple mending machine will be $100 or less, a good machine will be $150 or less a better one $200 or less
  • You can find great deals on used machines! Check out your local craigslist or Ebay or Amazon. When getting a used machine you want to make sure that they are including all the original parts and if they have the manual great! Its not a big deal if they don't have the manual because you can download them usually. But you will want the original power cord and foot pedal AND BOBBIN! My old machine used a slightly larger (and metal) bobbin and because of that I couldn't switch bobbins between my machines or the stitching would be all messed. You don't need to have all the bobbins that came with it but it will be good to have just one so that when you buy more you can be sure that they are the same size.
  • Don't feel the need to tie yourself down to a specific brand. I have had Singers and Brothers and completely random brands that I don't even know the name for! They all do the same things! BUT I will say that a major brand will be easier to get replacement parts for if need be.
What am I going to use the machine for?
  • If you are just mending some of your old tattered clothes then you just need a simple 2 or 3 function mending machine. I actually just scored an old Singer Tiny Tailor at my local Disabled Veterans Thrift Store for $3! It was missing a couple parts but after spending $10 on parts it is up and running!
  • If you plan on doing regular crafting and making some clothing you will want a machine with a few more options than just a plain mending machine. You will want to be able to do straight and zig zag stitches at least. Most machines (even the very basic ones) today have at least 5 different stitch options.
  • If you plan on quilting (which I honestly don't know the first thing about!) you will want something with a few decorative stitches along with the standard stitches. You will want it to include the quilters walking foot for when you need it.
  • And if you plan on making things to sell you may want a commercial machine or even a serger to finish edges. I will be asking Santa for a serger this Christmas! But for your every day homemade clothes and crafts you wont need anything too fancy.
How often will you be using the machine?
  • Some machines come built into nice tables (or you can buy a separate table... my sewing table has been my favorite sewing accessory!) so they fold under and you could never tell that it was meant for a sewing machine. These are good if you don't have a specific room for sewing but you want your machine accessible at all times. They keep your crafting area nice and neat.
  • most machines will come with a case of some sort. Some are hard, some are soft. If you don't plan on using the machine often and you wont have a sewing table then a hard case will keep it safe when you store it.
In my experience there are a few options that I can not live without when it comes to a good machine.
  1. It must be able to wind a bobbin. You can buy a bobbin threader but why when you are buying a sewing machine that should be doing it anyway!
  2. It should have a self threading option. That is just a luxury that I can not live without anymore. I have been spoiled and I will never buy another machine without that option again! But did you know that old sewing kit that you bought has a little tool to help you thread a needle? I never knew what the heck it was when I started out but I use it all the time for when I am hand stitching something.
  3. You will want a machine that allows you to make a button hole. You may not use this all the time but you will want to have that option for when you need it.
  4. You will want a good accessory package. Most machines will come with a screw driver, extra needles, extra bobbins, a seam ripper (If it didn't come with one GET ONE!), a couple different presser feet (including the button hole making foot) a thimble, and maybe a few pins.

My best advice is to do your research before you get to the store. Or if you are already at the store but not planning on buying yet then snap a picture of all the brands they carry and when you get home do some research. Read the reviews and make your choice. I really love Sew-Z! She is much better than my old machine. If you are like me you will be forming a long relationship with this little machine. You want to be as happy with it as you can be. You can also ask the workers in the fabric store (or fabric department if you are at Walmart) most of the people who work there do so because they enjoy sewing also!

If you want me to compare a couple specific machines for you just let me know and I will see what I can find out for you. if you aren't sure if something is really a good deal ask me and I will check into it. Also let me know what you go with or what you already have. Do you have any specific functions or accessories that you cant live without?

Sunday, April 3, 2011

Let me introduce you to Sew-Z

I have been blogging about mommyhood and such for a little while now and I have seemed to steer more in the sewing and crafting direction lately so I have decided to start anew with a blog devoted solely to my sewing and crafting! I hope to help even those who are "sew" illiterate to make their own clothing, baby products and whatever else I feel like making! I will also take requests if you have any. Or if I make something that you really like but do not have the time to make yourself let me know and I can make it for you! By no means am I claiming to be some expert or professional seamstress... just a girl who one day borrowed her mother's (which was HER mother's) sewing machine to fix her favorite pair of pants one day and just never gave it back! I fixed those pants and made a purse and book covers (as I was still in the 7th grade then) and a shirt all in a day! I became a creator that day and have never looked back!

I have, however, since moved on and bought a new sewing machine! Well actually my husband got it for me and I still haven't learned all the functions on it. But that's OK because all sewing machines do the same general things. If you are going to be a regular follower of this blog though I should really introduce you to my machine, who I like to call "Sew-Z"... get it... its like Suzie only its "Sew-Z" because she's a sewing machine! HA Anyway, Sew-z is a Brother CS6000i She has lots of built in stitch options and is much more computerized that my mom's old Singer.

But whether you have the same machine as I do or you have something more or less complicated all machines have many general similarities. They pretty much all require the same things to sew and thread just about the same way. Here are a couple videos I made this morning on the various parts of a typical machine and how to make a bobbin and thread a machine and sew!

This video just introduces you to the various parts of my machine. Your machine may have some differences but they are all generally very similar. 

This next video will show you how to make a bobbin and thread a machine. All machines are a little different but they all are generally the same. I tried to explain some of the differences. 


Here are some closeup pictures of the needle and bobbin area
basic anatomy of the needle area

using the auto threading hook

when threading the bobbin this is the general direcion that it will go. Be sure to leave enough extra thread so that the machine can pull up the bobbin thread when you sew.
And thats it for an intro. Do you know a little more about your machine now? If not email me a picture of your machine or tell me the brand and model that you have and I will help you figure out what is where and how to prepare your machine for sewing. Once you do this a few times it becomes second nature!

When you get yourself all ready to go come back and we will get started on our first project. A very simple super easy woven baby wrap or baby carrier.